My Cart
0
You have no items in your shopping cart.
There are all sorts of reasons why you might need to take one of your internal doors off its hinges. You could be laying a new carpet, stripping or painting it, or sanding down an edge that’s rubbing against the door frame. Of course, you could even be replacing it with a brand new internal door from our range here at Savoy Timber – like this Deanta Pre-Finished glazed Mexicano style oak door, with etched glass. Whatever the case, we’ve got some top tips to help you do so right here at Savoy Timber. Read on!
You’ll be glad to hear that most of the time, this won’t be a tricky job. You’ll only need:
So… let’s get started, shall we?
Loosening the hinge pins
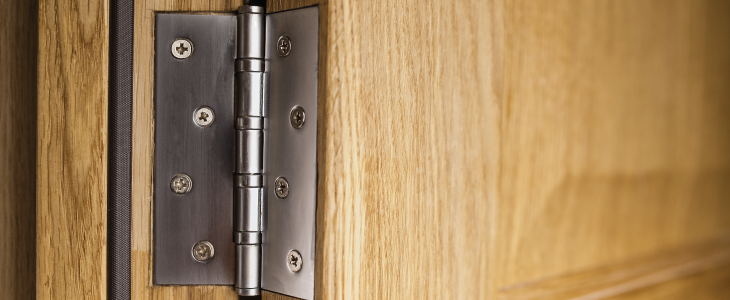
First, you’ll need to close and latch your door. Trust us, it makes the job a whole lot easier. Now, the next step is to remove the hinge pins. To do this, place the pointy end of a nail underneath each pin, and gently knock the bottom of the nail with the hammer. Make sure you do it gently! Gradually, the nail should knock the hinge pin loose. Don’t try and drive it all the way out though, as you could damage the trim with the hammer.

Removing the hinge pins
After each pin has popped up by an inch or thereabouts, pull it free with your fingers. They should come out pretty easily, but for any tough ones you can use a little WD40 to loosen them further. If that’s not doing the trick, use the head of your flat-bladed screwdriver and brace it against the underside of the knuckle of the stiff pin. Knock the underside of the screwdriver in the same way you did with the nail, and it should nudge the pin to freedom.
Removing the door
This is where your large bit of cardboard comes in. Lay it down on the floor where you plan to place your door, so you can protect your surfaces. Now, grasp the doorknob firmly with one hand and place the other on its surface near one of the top hinges. This allows you to balance the full weight of the door as you carefully lift it off its hinges.
Of course, it’s possible that the weight of the door means that things aren’t quite that simple. No shame in that – we can’t all be Hercules! Just place the pry bar underneath the door to take the weight off, which should give you the leeway you need to remove the door. Now you’re free to crack on with redoing the carpets, sanding down that rough edge, or preparing your brand new oak internal door to hang in its place.

Whether you’re re-hanging the same door or you’ve bought a new oak internal door from our range (such as this Mexicano pre-finished oak door), the process is the same. Pick up the door and line it up with the frame, making sure to brace yourself against its centre. Tip it slightly towards the top, until you engage the knuckles of the top hinge. If you’ve done it correctly, the weight of your internal door should now be hanging on the top hinge. Move on to work the other hinges into place. Keep an eye out for whichever one lines up properly first, and push the hinge pin into place, tapping it gently in with the hammer. Repeat the process for the other pins.
Congratulations! You’ve successfully hung your door. Open and close it a couple of times to make sure nothing’s rubbing where it shouldn’t be, and you should be sorted! Of course, if something is rubbing where it shouldn’t be, we’ve got a post for that too, running you through how to fix a door that won’t close. Otherwise, feel free to browse our huge range of internal doors right here on our website, available in a range of colours and styles. Don’t forget, you can always pay a visit to one of our DIY stores across Preston, Blackpool or Wigan to see what they look like in person. There, our friendly members of staff are always milling about to help you with anything you might need!

